[vc_row][vc_column][vc_single_image image=”1500″ img_size=”full” alignment=”center”][vc_column_text]
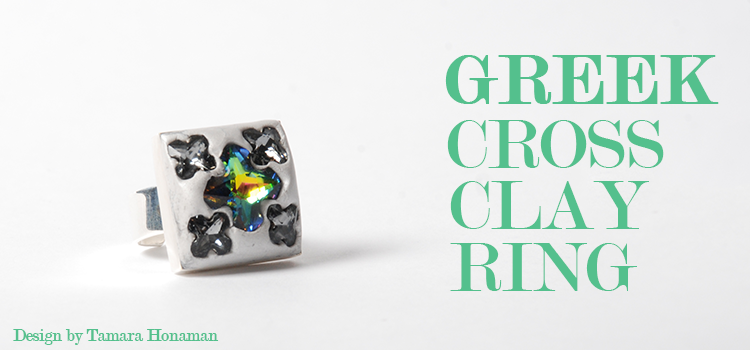
Find yourself whisked back to a time when they wore floor-length robes and lounged on cushions next to the sea. Find yourself transformed into a goddess when you wear the Greek Cross Clay Ring.
[/vc_column_text][vc_custom_heading text=”SUPPLIES” font_container=”tag:h2|font_size:32|text_align:center|color:%2354c08d” google_fonts=”font_family:Open%20Sans%3A300%2C300italic%2Cregular%2Citalic%2C600%2C600italic%2C700%2C700italic%2C800%2C800italic|font_style:700%20bold%20regular%3A700%3Anormal”][/vc_column][/vc_row][vc_row][vc_column][vc_column_text]
| PRODUCT GROUP | AMOUNT | SIZE | COLOR | PURCHASE |
|---|---|---|---|---|
| SQUARE RING | 1 | 21 mm | SILVER OVERLAY | PURCHASE SQUARE RING |
| CERALUN CLAY | 100g | SILVER | PURCHASE CERALUN CLAY | |
| SWAROVSKI GREEK CROSS FANCY STONE | 1 | 14 mm | CRYSTAL VITRAIL MEDIUM | PURCHASE SWAROVSKI FANCY STONE |
| SWAROVSKI GREEK CROSS FANCY STONE | 4 | 8 mm | CRYSTAL SILVER NIGHT | PURCHASE SWAROVSKI FANCY STONES |
| NON-LATEX GLOVES | 1 | |||
| HAND WIPE | ||||
| RUBBING ALCOHOL AND COTTON SWAB |
[/vc_column_text][/vc_column][/vc_row][vc_row][vc_column][vc_custom_heading text=”CREATING THE GREEK CROSS CLAY RING” font_container=”tag:h2|font_size:32|text_align:center|color:%2354c08d” google_fonts=”font_family:Open%20Sans%3A300%2C300italic%2Cregular%2Citalic%2C600%2C600italic%2C700%2C700italic%2C800%2C800italic|font_style:700%20bold%20regular%3A700%3Anormal”][/vc_column][/vc_row][vc_row][vc_column][vc_column_text]
Step One: While wearing gloves, break off equal parts of Part A and Part B of the Ceralun compound.
[/vc_column_text][/vc_column][/vc_row][vc_row][vc_column][vc_single_image image=”600″ img_size=”full” alignment=”center”][/vc_column][/vc_row][vc_row][vc_column][vc_column_text]
Step Two: Blend the two parts of Ceralun together, mixing until fully blended.
[/vc_column_text][/vc_column][/vc_row][vc_row][vc_column][vc_single_image image=”601″ img_size=”full” alignment=”center”][/vc_column][/vc_row][vc_row][vc_column][vc_column_text]
Step Three: Clean the surface of the bezel where the Ceraun will be set. Place the blended piece of Ceralun into the bezel setting. Blend the epoxy into the setting, covering all areas and forming a well-rounded (or square if you prefer) surface.
[/vc_column_text][/vc_column][/vc_row][vc_row][vc_column][vc_single_image image=”602″ img_size=”full” alignment=”center”][/vc_column][/vc_row][vc_row][vc_column][vc_column_text]
Step Four: Place the Swarovski crystal 14mm Greek Cross Fancy Stone into the center of the Ceralun. Press the fancy stone into the Ceralun until the girdle is just below the surface of the Ceralun.
[/vc_column_text][/vc_column][/vc_row][vc_row][vc_column][vc_single_image image=”603″ img_size=”full” alignment=”center”][/vc_column][/vc_row][vc_row][vc_column][vc_column_text]
Step Five: Place the Swarovski crystal 8mm Greek Cross Fancy Stone into the Ceralun, positioning it in one corner of the bezel so it is equidistant from the corner of the setting and the inside corner of the 14mm Greek Cross Fancy Stone.
[/vc_column_text][/vc_column][/vc_row][vc_row][vc_column][vc_single_image image=”604″ img_size=”full” alignment=”center”][/vc_column][/vc_row][vc_row][vc_column][vc_column_text]
Step Six: Repeat to place all Swarovski crystal 8mm Greek Cross Fancy Stones.
[/vc_column_text][/vc_column][/vc_row][vc_row][vc_column][vc_single_image image=”605″ img_size=”full” alignment=”center”][/vc_column][/vc_row][vc_row][vc_column][vc_column_text]
Step Seven: Using your fingers or your favorite clay tools, smooth the surface of the Ceralun. Press down on all Greek Cross Fancy Stones to ensure their secure placement. If needed, use a hand wipe to clean the surface of the setting. Set the ring aside so the Ceralun can cure overnight.
[/vc_column_text][/vc_column][/vc_row][vc_row][vc_column][vc_column_text]Design by Tamara Honaman.[/vc_column_text][/vc_column][/vc_row] дебетовые карты с бесплатным обслуживанием


