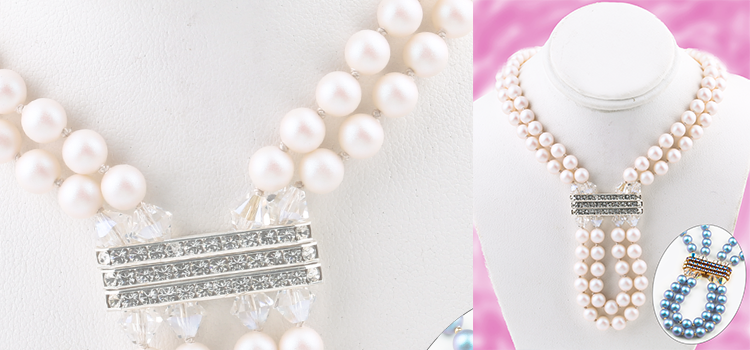
An elegant addition to any wardrobe this beautiful double strand necklace can be made as shown or with any of your favorite Swarovski crystal pearl colors. If you are not ready to tackle the knotting in between each pearl then opt for a seed bead or small spacer bead instead!
SUPPLIES
| Item | Amount | Size | Color | Buy |
|---|---|---|---|---|
| Swarovski Pearls | 166 | 6mm | Any | Shop Pearls |
| Swarovski Bicone Crystals | 8 | 6mm | Any | Shop Crystals |
| Spacer Bars | 3 | 5-strand | Crystal | Shop Spacer Bars |
| 100% Silk Thread | 2 Spools | Size 6 | Any | Shop Thread |
| Clam Shell Knot Enclosures | 4 | n/a | Any | Shop Knot Enclosures |
| Double-Strand Clasp | 1 | n/a | Any | Shop Clasps |
| Open Jump Rings | 4 | n/a | Any | Shop Jump Rings |
| G-S Hypo Cement Glue | n/a | n/a | n/a | Shop Cement Glue |
INSTRUCTIONS
We’ll create this necklace strand-by-strand. Follow the step-by-step instructions below to create the Timeless Double-Strand Knotted Pearl Necklace.
CREATING THE FIRST STRAND (INNER STRAND)
STEP 1: Unwind the silk thread from its spool and wind it around your hand to stretch the thread and smooth out the kinks.
STEP 2: Make a double or triple knot at the end of the thread (the non-needle end), about 2” up from the end, and thread a clamshell on so that the knot slides inside of it. Leave the clam shells open on both strands of the necklace until all the pearls are knotted.
STEP 3: Make your first knot above the clamshell.
STEP 4: Thread 35 pearls onto the thread.
STEP 5: Slide the first pearl down, firmly against the knot that you just made above the clamshell. Leave the other pearls further up on the thread, making sure to give yourself space to make a new knot. Make a knot at the top of the pearl.
STEP 6: Slide the second pearl down, firmly against the knot just made above the first pearl. Make a knot at the top of the second pearl.
STEP 7: Continue sliding each pearl down after a knot has been made until all the pearls have a knot in-between of each other. Make sure you make a knot on top of the 35th pearl and slide a Swarovski bicone crystal down to that pearl. You do not need to make a knot on top of the crystal.
STEP 8: Thread the needle through the 2nd hole in, on the left-hand side of all the 5-strand crystal spacer bars. Thread the 2nd crystal onto the strand. Make a knot on top of the 2nd crystal, paying attention to ensure the crystals stay snug and tight against the spacer bars.
STEP 9: Thread 11 pearls onto the thread and continue making knots between each pearl, including making a knot after the 11th
STEP 10: Thread the 3rd crystal onto the strand then thread the needle through the 2nd hole in, on the right-hand side of all the 5-strand crystal spacer bars. Thread the 4th crystal onto the strand. Make a knot on top of the 4th crystal, paying attention to ensure the crystals stay snug and tight against the spacer bars.
STEP 11: Thread 35 pearls onto the thread and continue making knots between each pearl, including making a knot after the 35th
STEP 12: Thread the 2nd clamshell on, with the knot enclosure facing outwards.
STEP 13: Make a double knot inside the clamshell. Yes, it’s a little tricky!
CREATING THE SECOND STRAND (THE OUTER STRAND)
STEP 14: Unwind the silk thread from its spool and wind it around your hand to stretch the thread and smooth out the kinks a little bit like you did in Step 1 for the inner strand above.
STEP 15: Repeat steps 2 through 7 above.
STEP 16: Thread the needle through the last hole on the left-hand side of all the 5-strand crystal spacer bars. NOTE: The middle hole of the spacer bars will not be used. Thread the 2nd crystal onto the strand. Make a knot on top of the 2nd crystal, paying attention to ensure the crystals stay snug and tight against the spacer bars.
STEP 17: Thread 14 pearls onto the thread and continue making knots between each pearl, including making a knot after the 14th
STEP 18: Thread the 3rd crystal onto the strand; then thread the needle through the last hole on the right-hand side of all the 5-strand crystal spacer bars.
IMPORTANT: Look at how the outer strand lays against the inner strand in this bottom section before threading on the 4th crystal. You may feel the need to knot another pearl on, depending on how tight your knots are compared to the knots in the inner strand.
STEP 19: Thread the 4th crystal onto the strand. Make a knot on top of the 4th crystal, paying attention to ensure the crystals stay snug and tight against the spacer bars.
STEP 20: Repeat steps 11 through 13 above.
FINAL TOUCHES TO FINISH THE NECKLACE
STEP 21: Before closing up each clamshell, place a dab of G-S hypo cement glue on the double knot inside each clamshell, being careful to not get any glue on the pearls; let it dry for a few minutes; trim the extra thread and close each clamshell, using flat nose or chain nose pliers. Silk thread is slippery and tends to fray and the use of the glue helps prevent this.
STEP 22: Attach each clam shell to a double-strand clasp, using open jump rings.


